Attiny4313 and I2C master using USI
Getting I2C working with attiny processors has been yet another long-time project of me. It has been stuck mostly because I haven't had time to create attiny4313 board with I2C chip on it.
But finally, I managed to create one:
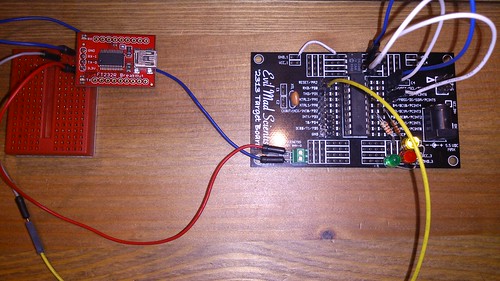
The attiny2313 board, where I put all the stuff, comes from Evil Mad Scientist.
On the board, I soldered I2C EEPROM (24LC04B), some headers, and leds. I also decided to save some effort and left out the pull-up resistors from I2C connection, because the I2C connection seemed to work without them.
The pin setup of the eeprom is quite easy. Pins 1..4 to go ground, pin 5 is SDA, pin 6 SCL, pin 7 not used, and pin 8 VCC. Ground pins were soldered, but for VCC, SDA, and SCL I used jumper wires so that I can disconnect the chip when needed.
The board also has 8MHz oscillator and the attiny4313 processor is configured to use it at full speed (8MHz). This allows decent UART speed (9600bps) without too big error percentage.
Code
Instead of TWI, attiny processors use USI for I2C. But there is no existing support for USI/I2C in AVR-Ada, so I had to create the code from scratch using documentation and example source code from Atmel.
As the Attiny4313 will act as I2C master, I created similar package has I have for Atmega series:
package Attiny_TWI.Master is
   procedure Init;
   procedure Stop;
   procedure Write_Data (Address : Interfaces.Unsigned_8;
                         Data    : Data_Buffer);
   procedure Request_Data (Address : Interfaces.Unsigned_8;
                           Data    : in out Data_Buffer);
   function Get_Error return TWI_Error_State;
end Attiny_TWI.Master;
The difference is that for attiny, the API implementation uses polling and all procedures are blocking. I might change that in the future, but for now the blocking/polling behaviour is good enough.
And when one wants to read from EEPROM, the package is used like this:
EEPROM_Address : constant := 16#50#;
Buffer         : Attiny_TWI.Data_Buffer (1..1);
Command        : Attiny_TWI.Data_Buffer (1..1) := (1 => 50);
...
Attiny_TWI.Master.Init;
Attiny_TWI.Master.Write_Data (EEPROM_Address, Command);
Attiny_TWI.Master.Request_Data (EEPROM_Address, Buffer);
After Request_Data call, we should have Buffer full of data. In this case the lenght of Buffer is 1 byte, so we have one byte of data from EEPROM address "50".
Note: 24LC04B has 512 bytes of space. If you want to address the upper 256 bytes, you need to turn on the lowest bit of EEPROM_Address (EEPROM_Address or 1).
And if you want to write data to EEPROM, you use Write_Data procedure instead of Request_Data:
Attiny_TWI.Master.Write_Data (EEPROM_Address, Buffer);
This time the code is available from my arduino-blog repository, under directory examples/attiny-twowire.
The Attiny_TWI.Master package still needs some finishing touches (like fixing some delays), but once I am happy with it, I will commit it into AVR-Ada repository.
Update 2013-07-15: Fixed EEPROM memory addressing. My original routine (2 bytes for address) was for 24LC256, while I used 24LC04B here (1 bit from EEPROM I2C address + 1 byte for address).