Measuring the accuracy of delays in AVR-Ada
AVR-Ada provides basically two ways to delay the code execution.
One way is busy looping using Generic_Busy_Wait_Seconds and Generic_Wait_USecs procedures from the AVR.Wait package.
procedure My_Wait is new AVR.Wait.Generic_Busy_Wait_Seconds
  (Crystal_Hertz => 16_000_000);

procedure Wait_1000ms is new AVR.Wait.Generic_Wait_USecs
  (Crystal_Hertz => 16_000_000, Micro_Seconds => (1_000_000));
Another way is to use AVR.Real_Time.Delays package and Delay_For or Delay_Until procedures. GNAT also automatically translates "delay X.Y;" and "delay until X;" statements into calls to the procedures of AVR.Real_Time.Delays. Only trick required is have "with AVR.Real_Time.Delays;" statement in your code, since AVR-GNAT is not clever enough to do that automatically.
delay 1.0;
Sometimes people have been wondering how accurate the various delay methods are.
I decided to test the delays on Arduino UNOr3 and Arduino Leonardo using following program:
with AVR.MCU;
with AVR.Real_Time.Delays;
with AVR.Interrupts;
with AVR.Wait;
with Interfaces;

use AVR;

procedure LED is
   use type Interfaces.Unsigned_32;

   procedure Wait_1000ms is new AVR.Wait.Generic_Wait_USecs
        (Crystal_Hertz => 16_000_000,
         Micro_Seconds => (1_000_000));

   -- For Arduino Leonardo
   -- LED_Port : Boolean renames MCU.PINC_Bits (7);
   -- LED_DD : Boolean renames MCU.DDRC_Bits (7);

   -- For Arduino UNOr3
   LED_Port : Boolean renames MCU.PINB_Bits (5);
   LED_DD : Boolean renames MCU.DDRB_Bits (5);

begin
   AVR.Interrupts.Disable;

   -- AVR.MCU.PRR1_Bits(7) := True; -- uncomment for Leonardo

   LED_DD := DD_Output;
   LED_Port := False;

   AVR.Interrupts.Enable;

   Wait_1000ms;
   LED_Port := True;
   Wait_1000ms;
   LED_Port := True;
   Wait_1000ms;
   LED_Port := True;
   Wait_1000ms;
   LED_Port := True;
   delay 1.0;
   LED_Port := True;
   delay 1.0;
   LED_Port := True;
   delay 1.0;
   LED_Port := True;
   delay 1.0;
   LED_Port := True;

   loop
      LED_Port := True;
      delay 1.0;
   end loop;
end LED;
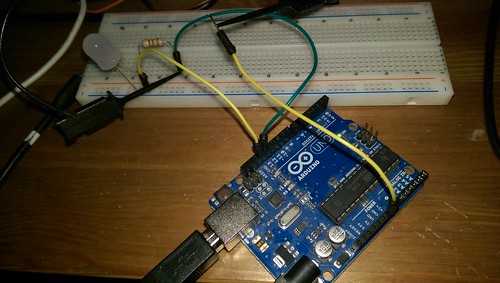
I uploaded the program on Arduino and then connected Saleae Logic logic analyzer to the LED pin of Arduino to measure the LED blinking delay.

For Arduino UNOr3 I got follow capture:
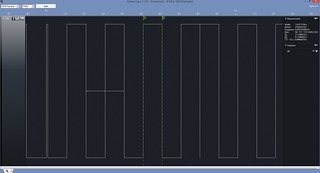
And same for Arduino Leonardo:
On Arduino UNOr3 the Wait_1000ms call took 1.012_7 seconds and on Arduino Leonardo 1.012_9 seconds. So, on both boards, 1s delay using busy looping Wait_1000ms took about 1.3% more than what it should have.
On the other hand, "delay 1.0" call, which is implemented using timers, was quite accurate. On Arduino UNOr3 "delay 1.0" took 0.999_821 seconds and on Arduino Leonardo 1.000_037 seconds.
From this we can see that waiting one second using "delay 1.0" is probably accurate enough for most purposes. Error on Arduino UNOr3 is less than 200 microseconds and on Leonardo 37 microseconds.
However, to make Wait_1000ms call more accurate, I changed it to following on Arduino Leonardo:
procedure Wait_1000ms is new AVR.Wait.Generic_Wait_USecs
  (Crystal_Hertz => 16_000_000,
   Micro_Seconds => (1_000_000 - 12500));
Value 12500 was found by experimenting. Each invidual device is different and there is some error in the measurement also, so this value might not work on your devices.
Notes
- Official Arduino UNOr3 and Arduino Leonardo devices use an external crystal for clock. While the crystal are pretty accurate, there are differences between crystals. For your devices the timings are most likely different. However, the conclusion of this small experiment should be same: on AVR-Ada, delay using timers ("delay 1.0") is more accurate than delay using busy looping.
- Some Arduino clones might use internal oscillator or external ceramic oscillator. These are less accurate than the crystals.
- If you find that the internal oscillator on your Arduino clone is very inaccurate, you can try to change the calibration by modifying the OSCCAL register.
As usual, the code is found from Sourcehut.