Using AVR-Ada with attiny2313
Required parts:
- attiny2313 processor
- USBtinyISP
- AVR programming adapter
- 6 jumper wires
- breadboard
- 220 ohm resistor
- led
AVR-Ada is not only meant for Arduinos and other boards which use atmega series processors, but it can be also used with attiny processors.
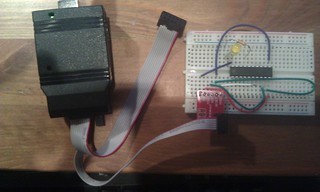
I assembled a minimal attiny2313 setup on a breadboard so that it can be programmed with USBtinyISP programmer. To reduce the mess with jumper wires, I used AVR programming adapter from Sparkfun.
From the attiny2313 datasheet you can see how to connect the processor pins to the adapter. Or you can just look at the picture below and check the connections from it.
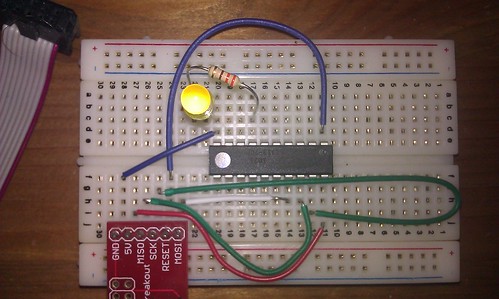
In addition to the programmer connections, I attached a led to pin 7 (PD3) via 220 ohm resistor.
Code
After having finished to with the setup, I wrote following code:
-- led.ads
with AVR;
with AVR.MCU;
with AVR.Wait;
use AVR;
procedure LED is
   procedure Wait_1s is new AVR.Wait.Generic_Wait_USecs
     (Crystal_Hertz => 1_000_000, -- attiny2313 runs at 1MHz by default
      Micro_Seconds => 1_000_000);

   LED_PIN : constant := 3;
   State   : Boolean := True;
   LED     : Nat8;
begin
   MCU.DDRD_Bits (LED_PIN) := DD_Output;
   loop
      State := not State;
      MCU.PortD_Bits (LED_PIN) := State;
      Wait_1s;
   end loop;
end LED;
Explanation of some bits:
procedure Wait_1s is new AVR.Wait.Generic_Wait_USecs
  (Crystal_Hertz => 1_000_000, -- attiny2313 runs at 1MHz by default
   Micro_Seconds => 1_000_000);
Here I create an instance of Generic_Wait_USecs procedure, which waits for one second. By default, attiny2313 uses its internal clock which runs at 1MHz (8MHz oscillator with CKDEV8 fuse bit enabled => 8MHz / 8 => 1MHz).
Generic_Wait_USecs is a busy loop wait, so the processor will run at full speed during the waiting. It consumes power, but is good enough for our purposes in this case.
LED_PIN : constant := 3;
MCU.DDRD_Bits (LED_PIN) := DD_Output;
MCU.PortD_Bits (LED_PIN) := State;
Pin 3 from port D runs the led. The pin is initialized as output pin and its state is controlled by "State" variable.
Building
To build the source code for attiny2313, you first need a project file
-- led.gpr
project Led extends "avr_app" is
   for Main use ("led.adb");
   for Object_Dir use "objects";
   for Exec_Dir use ".";
   for Source_Dirs use (".");
end Led;
And then you need to compile the source code with avr-gnatmake:
avr-gnatmake -XMCU=attiny2313 -P led.gpr
avr-objcopy -O ihex -R .eeprom led.elf led.hex
The full source code can be found from my Bitbucket Mercurial repository.